How to make your own Isotope worlds
Isotope supports both single player and multi-player games. Single player games are easier to make, but multi-player games are often more fun. If this is your first time, I recommend starting by making a single-player game. (Many people can play your single-player game at the same time, they just can't see or interact with each other in the game.)
All you need to get started is some web space. If you don't have any web space you can either buy some or use your computer as a web server. I recommend using your computer as a web server because: 1- there are no size limits except the size of your hard drive, and 2- it's easier to update your files because they're on your own computer. Click here for instructions on using your computer as a web server.
Now you're ready to start making games. Every game has at least three parts: 1- a ".realm" file, 2- a ".gasp" file, and 3- some images. The easiest way to make these is to start with a working game and then tweak them from there. Where can you get a working game? Whenever you play a game it saves all the files in your "cache" folder. If you look in there, you'll probably find everything you need. But don't start tweaking inside the cache folder or your changes might get overwritten. Copy the files into your web space instead.
Now point Isotope to your ".realm" file by editing the URL in the account file for your avatar. When you first try running the game, you'll probably discover that there are some missing files. That just means you didn't copy something that you need. So go copy the missing file into your web space and try again until it works.
When you play the game it will download those files and save a copy in your cache folder. When you make changes to your files, be sure to delete the cache folder before you play again or else you won't see your changes. You have to delete your cache EVERY time your make changes.
Multi-player games allow players to see each other and interact while playing. A web server is not sufficient to host this kind of game, so you will need to run both a web server and an Isotope server on your computer. Don't panic, I'll provide instructions for how to do all of this. First, click here for instructions on getting your web server running. Got that? Okay, now let's start the Isotope server.
The Isotope server is built right into the same executable file that you play the game with. Why? Well, they both use so much of the same code that it seemed logical just to package them together into one binary--besides it isn't very big anyway. To run Isotope in server mode, you just need to provide a couple extra command-line parameters like this:
Isotope.exe server [www-root-path]
(except replace "[www-root-path]" with the path to the web root that your web server uses). Now put your game content somewhere in your web-root-path, and you're ready to test your game in multi-player mode. (You can run multiple game clients on the same computer, so you don't actually need several computers to test your multi-player game.)
When you make a multi-player game, you need to be careful to make sure everyone gets updates when you make changes to the objects in the game. I'll tell you more about that later, so keep reading.
The first thing your client downloads when you visit a world is a map file (a .realm file). This is an XML-based file that tells the client what other files it needs to download and where to put all the objects in the world. The fastest way to learn about these map files is to look at one. Visit some world (it's best to start with a simple one) and look at the map. (There should be a button in the game menu that lets you view the map.)
Mostly I'll leave you to figure out for yourself what it all means, but here's some notes on each of the major sections:
Camera - This section specifies how the camera starts when you enter the world. If PointOfView="ThirdPerson" then you will see your avatar character. If PointOfView="FirstPerson" then you will see the world through the eyes of your avatar and you can click on objects directly with your mouse. Yaw specifies the direction the camera faces in radians (from 0 to 2*PI), Pitch specifies a value that tells how high the horizon will appear, Zoom specifies how much the camera will start zoomed in or out.
Images - This section specifies a list of images that the client must download before displaying the world. These images are referenced by ID from other sections.
Animations- This section specifies a list of animations that will be used on the map. Animations consist of an image, a bunch of rectangular regions of the image that comprise a frame in the animation, and a time value for how long to spend on each frame.
Sounds - This section specifies a list of sound effects that the client must download before the world is displayed.
Spots - This section specifies bookmark locations within the map where the client may wish to go. The spot where the avatar starts is specified as an HTTP parameter in the URL. For example: "http://somedomain.com/somemap.realm?spot=foo" will tell the avatar to start at spot "foo".
Objects - This section specifies the objects that will appear on the map. Each <obj> tag will specify several attributes:
id - A unique ID for the object. The scripts can use this ID to obtain references to the object
class - A class in the script file. This tells the object how it will behave and what it will do when you act on it
paramN - Each class requires a certan number of parameters in the constructor. You specify those parameters here.
x, y, z - The location on the map where the object will start
sx, sy, sz - The size of the object (width, depth, height)
Isotope uses a billboard-based graphics engine instead of a polygon-based graphics engine like most 3D games. Why? Although polygon-based engines produce nicer looking graphics, it's much easier to produce artwork for billboard-based engines. One of the primary goals of Isotope is to encourage other people to help extend the game, so it is very important to use an engine that is friendly to artists and people that might want to contribute their own worlds to the game.
One of the most common mistakes people make when trying to make their map files is that they think they can specify where the billboards themselves will be placed on the screen. The billboards are actually considered to be the "view", but the map files are part of the "model". The map files specify a 3D rectangular space that the object occupies. The location where the engine draws the billboard is determined by the engine itself. It's a good idea to know how the engine works so you can create the look you want. So let's talk about how the billboard engine works...
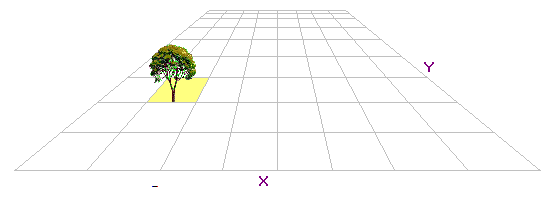
A billboard engine works with flat sprites, much like stage props. In our engine, every object has an (X, Y, Z) position in 3D space, and every object also has a width, height, and depth. In other words, everything can be thought of as a rectangular cube. (3D rectangles are much easier to work with than complex shapes like persons or trees.) But the objects don't have to look like 3D rectangles. When the engine draws an object, it really only draws a "billboard" on the fore-most surface of the 3D rectangle.

If the camera were to pan around an object, the billboard would always be shown on the side of the object closest to the camera. If your object only has one frame, then it will appear to always face the camera no matter which way the camera is pointing.

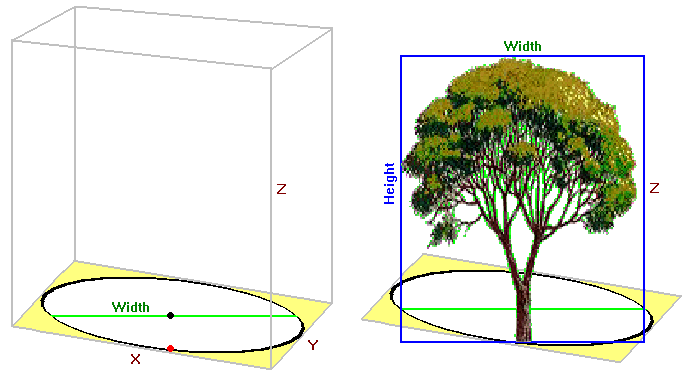
A more detailed understanding of how these billboards work will help you produce better artwork for this engine. Imagine an ellipse that fits snugly inside the bottom surface of the rectangle. This ellipse touches all four sides of the rectangle at the center of the side. When the engine actually draws the billboard, it will draw it such that the bottom center of the billboard touches the point on the ellipse closest to the camera (the red dot in the diagram below). The billboard will always face the camera. Its width will be the diameter of the ellipse such that the bisecting line faces the camera. The height will be the Z-size of the billboard. In other words, the display width of the billboard depends on the X-size, the Y-size, and the direction of the camera. The height of the billboard is always the Z-size no matter which way the camera is facing.

If your object has only one frame, then it is common for the object to have the same X-size and Y-size. (If they are different sizes then the object will appear to stretch and shrink as the camera pans around it.) But you can have more frames for your object. If you have many frames then it might make sense for the X-size to be different than the Y-size.

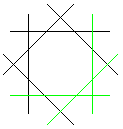
The above example shows an object with 8 frames. The frames are distributed evenly around the 360 degrees of the object (see top-view diagram below). Since only 90 degrees are shown here, you only see the three frames (the green ones) that correspond to these 90 degrees.

Obviously the more frames you have, the more fluid it will appear when the camera pans around your object. The easiest way to generate lots of frames is to create a 3D model and then render it from many different points of view. But unlike a polygon-based graphics engine, you don't have to build a 3D model if you're happy with just a single frame that always faces the camera.
Each page (aka realm/game) has at least two files associated with it, a ".realm" file and a ".gasp" file. The ".realm" file is an XML document that specifies the media and initial map for the realm. It's rather straightforward, so I'll assume you can take a look at one yourself and figure out its structure. The most interesting tag in this file is probably the "<Objects>" tag. This tag contains specifications for all the objects that compose the map. Each object is associated with a class in the ".gasp" file. The class is the script code that gives the object its personality and behavior.
We use Gasp, an open source (LGPL) scripting language for our scripts. Gasp is written in C++ and gives us the flexibility to write our own methods in C++ that will be callable from Gasp scripts. We can call from C++ to Gasp and from Gasp to C++, so it offers pretty much everything we need to script our games. The syntax of Gasp is somewhat different than common scripting languages like Java, C#, or JavaScript, so this is a drawback for our users, but those languages each have security models that we can't work with, a difficult and slow interface to work through, and in the case of JavaScript capability limitations that we can't swallow. So Gasp is our scripting language for now.
If you're not familiar with Gasp, click here for some brief documentation about it.
Each class for scripting a game object must inherit from "RealmObject". RealmObject implements the IObject interface, but doesn't provide implementations for all the methods in the IObject interface, so those methods are abstract and must be implemented in the inheriting class. These methods are called from the C++ game engine. If you understand the purpose of each of these methods, when they're called, and how to tweak them, then you pretty much understand all about how our game works:
&update(Float:time) - This method updates the object. A typical implementation will calculate the time delta since the last time the object was updated and then adjust the (x, y, z) position of the object by the product of the time delta and the object's current velocity. The game client calls this method from the main loop so that all the objects in the model are kept up to date as frequently as possible. The server does not need to update its objects so frequently, so it only calls this method lazily when an up-to-date object is needed.
getFrame(!Image:i, &Rect:r, Float:cameraDirection) - Whenever the game engine needs to refresh the screen it will call this method on each visible object to get the image that it should stretch-blit onto the screen.
&doAction() - This method is only called when the user right-clicks on the object (and is close enough to the object to reach it). This tells the object to do "it's thing". For example, a door object will open or shut, a lever object will toggle the position of the lever, an elevator object might go to the next floor, a bomb object might explode, etc.
&onGetFocus() - This method is called when the user approaches the object. The user must be close enough to reach the object, and it must be the closest object.
&onLoseFocus() - This method is called when the user walks away from the object, or becomes closer to another object.
validate(&Bool:ok, RealmObject:newOb) - When a client makes a modification to an object, it will send the modified object to the server. When the server receives the modified object, it will bring the old object up to date by calling update, and then call validate to see if the change is acceptable. If the change violates physical laws (ie warps the object to a far away position, exceeds speed capabilities, etc) then this method should set "ok" to "false" and the server will reject the change.
So if you want to script a new object, here's the steps you'll probably follow:
One "gotcha" to be aware of: Every object has some member variables named x, y, z, sx, sy, and sz. The variables x, y, and z specify the position of the object on the map. The variables sx, sy, and sz specify the object's size. If sx, sy, or sz is zero, then your object will be too small to see. So if you can't see your object, make sure you are setting those variables to reasonable values. Try setting them all to 100 if you don't know a better value.
Dynamic objects
There are two ways to add an object to a map: 1- Add an <Object ... /> tag to the .realm file, and 2- Instantiate the object dynamically in some scripted code. If you use the first technique, the object will implicitly appear on every client's map because every client will download the same .realm file, which will cause all those objects to be created when they enter the game. If you use the second technique, the object will only be created on the machine that executes that piece of script. If you want the object to appear on everybody's map, you must tell the server about the object. This is easy to do, just call the method "notifyServerAboutObjectUpdate". You can probably find an example if you look at some existing scripts. You should call this method anytime you make a change to an object's state and you want everybody to see the change.
There's one other "gotcha" that you should be aware of. Every object has a member variable named "time". This holds the timestamp of when the object was last modified. Usually when you instantiate an object, you will call the "init" method which sets the "time" variable to the current time. You should also set this variable to the current time whenever you change the state of the object before you notify the server about it. If you forget to update the time variable, all the other clients will think they already have a newer copy of the object so they won't bother to update it. (There's no need for the clients to waste bandwidth transferring old data.) So if you want to change the state of an object and you want everyone in the game to see the change, here's what you do:
Click here to read more about config.xml
todo: write about the account files